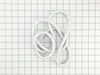
This dryer drum belt (Whirlpool Dryer Belt, Drive Belt) has four ridges, three grooves and is 1/4" wide, and 92 1/4 inches in length. It comes in black and is made of rubber. The belt transfers the ro...
This dryer door switch is a simple on/off switch mechanism that prohibits the dryer from operating when the door is open, and operates the drum light. White in color and 6.5 inches long, this OEM swit...
This white OEM dryer door handle is used to open and close the dryer's door. Comprised of plastic and 6-by-2-inches in dimension, the handle is sold individually and attaches to the dryer door. Your d...
This touch-up paint can be used on a wide variety of household appliances. It is most often used on washers, dryer, refrigerators, dishwashers, ranges, freezers, trash compactors, or microwaves. It is...
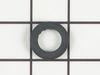
This part is the replacement single front panel clip for your dryer. It is made of metal and is approximately 2 inches long and ¾ inch wide. The front panel retainer clip is what holds the front panel...
Appliance spray paint is a great way to cover up any chips and scratches that have appeared on your appliances. Instead of replacing the part entirely, this is an easy fix. This is also a great way to...
This dryer drying rack is great for drying shoes and other items that cannot tumble dry. This dryer rack fits dryers that are 29 inches wide, have the letter "E" following the numbers in the model num...
$71.58
In Stock
Questions And Answers for 11072342511
We're sorry, but our Q&A experts are temporarily unavailable.
Please check back later if you still haven't found the answer you need.
Pryed dryer top open and opened front door. . Unscrewed the 2 retaining screws. Pulled old switch from the wiring harness. Put new switch in place and replaced the retaining screws. Put new switch wire plug into the wiring harness. Before closing top, checked door switch function with dryer on. Dryer cut off when door open an
... Read mored when closed dryer started normally. . . Maint. Note instruction book should warn that letting door slam, which I did on occaision, broke the switch arm. Might save future problems.
It was simple once I figured out what to do:). I removed the 2 screws on the top of the dryer... they were a bit hard to find. Even with the other descriptions on this site. I was removing things I didn't need to. The 2 screws you need to remove are under the LINT COLLECTOR LID. Remove those 2 screws & lift the lid... it will be tigh
... Read moret at first. the front of the lid has 2 "catches" in the corners.
The hardest part was getting the door switch assembly to "unplug". We pried it off -- eventually -- & then simply plugged in the new one.
Saved me LOTS of money & was worth the 30 minutes - 1 hour of work.
As I said previously, once you realize how to get the lid up & manage to pry off the plug, that's all there is to it -- easy!


 Diagram and Parts List for Kenmore Dryer")