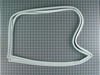
This door gasket, also known as a door seal, is sourced from the original equipment manufacturer for use in refrigerators and freezers. It is a flexible rubber strip that runs along the edge of the ap...
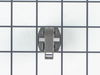
This gasket retainer clip kit is for freezers. There are 24 pieces in this kit. The clips are what secure the gasket and liner to the freezer lid. The clips are white in color and made of plastic. If ...
This part could be found underneath a fridge, dryer, or freezer. The original foot may be cracked, broken, or perhaps missing altogether. If you notice the appliance is uneven to the floor or wobbling...
This is white touch up paint for refrigerators, microwaves, ranges, dryers, and freezers. It is used to cover, or touch up, nicks and scratches on the appliance from wear and tear. It is an 18ml bottl...
This is a shelf support for freezers. It is used to help hold the inside of the shelf from both sides (left and right.) Please note: right and left side of shelf support are sold separately. If the sh...
This is a switch for your refrigerator, but you may also know it as a door switch or a plunger light switch. This part turns your appliance light on and off as the door is opened and closed. If your c...
This is a shelf support for the left side of a freezer. It is used to help support the inside of the shelf from both sides. *Please note: right and left side of shelf support are sold separately. If t...
This is a plastic OEM drain plug that is attached to the drain system of your appliance and is compatible with several different makes and models of refrigerators, freezers, and air conditioners. This...
The compressor start relay attaches to the compressor in your refrigerator. If your refrigerator will not start, one of the most common parts to fail is the compressor start relay. Sometimes called th...
A filter-drier in a refrigerator has two essential functions. The first is to absorb system contaminants, such as water, which can create acids. The second is to provide physical filtration. This mean...
$12.12
In Stock
Questions And Answers for 25329711990
We're sorry, but our Q&A experts are temporarily unavailable.
Please check back later if you still haven't found the answer you need.
The old gasket was obviously gapping, partially from age and partially from damage during a move. To make the repair, I loosened the screws that are under the gasket and hold it in, but did not remove them. Once all were loose, I removed the old gasket, then starting at the top, ran a thin bead of food grade RTV under the portion of the
... Read more door that captures the gasket. I put the sealant on that edge only, then carefully worked one of the short edges of the gasket under the plastic and tightened all but the corner screws. I then ran the RTV down the inside of the hinge side of the door and repeated the process, this time tightening the top screw and the hinge side screw at the top, but leaving the bottom most screw loose. I repeated the process on the opening side of the door. The bottom was the hardest because the gasket seemed just a little long and it was hard to get the RTV up and behind the door portion, but after a couple tried I got a good bead of sealant then slid the gasket under the door capture and tightened all the remaining screws. After closing the door, it was obvious that there were places were it did not seal well. I used some cardboard strips, cut from the box the gasket came in, to place inside the freezer, between the hard plastic of the door and the inside of the gasket where it laps over the screws. This helped a lot, but there were still a couple small areas, so I used more cardboard, from the outside, between the main portion of the gasket and the rim of the gasket. This eliminated all the gaps. I let this sit overnight and this morning removed all the cardboard for a great sealing freezer.
I removed the cover, used a multimeter to test the compressor circuit, and found the compressor start relay to be defective. Ordered a new one and installed it when it arrived.
Removed old gasket by loosening all the screws. Inserted new gasket. Be careful to prop up the plastic shell so that ALL screw holes line up, especially at the bottom, and that shell is not tilted. Then carefully insert gasket inch by inch and fasten very other screw, best from bottom up. Make sure that the gasket lip is clearly under the
... Read more shell and engaged with it. Before you do anything you have to straighten out ALL the kinks with a heat gun. Do not get too close. It takes a while.