If you have a leaking faucet that is constantly dripping, use these steps to get it repaired yourself. Whether you have a single-handle-style faucet or a two-handle-style faucet, we will cover the most common leaks that occur and how to fix them.
Single Handle Faucet
With the single-handle faucet, whether the leak is a drip coming out of the spout or a leak around the base of the stem, it is typically a single component that causes both issues.
Steps for repairing a leak around the base or spout:
You will start by turning off the hot and cold water supply to the faucet.
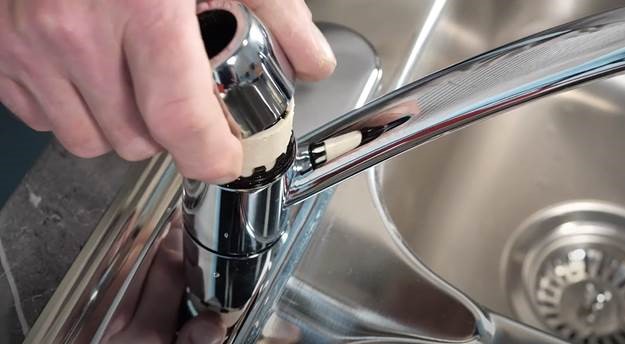
The cartridge for the single handle faucet is located just below the handle. Start by removing the handle. You will need to identify the type of set screw holes that are on the handle. Typically, a small Allen key or hex will do the job and are often supplied with the replacement cartridge.
Lift the handle off.
Remove the protective cover that sits over top of the cartridge. Some models may have a retaining nut on the top, but most of them are a friction fit or have an O-ring that holds it in place.
Now you will remove the cartridge, using the proper-size socket or an adjustable wrench. As you remove this there will be a fair bit of water that will come out, even with the supplies turned off. Have a clean cloth nearby to catch that excess water.
With the retaining cap removed, grasp the top of that cartridge, and pull it up and out of that opening. Most of these single-handled faucets use a similar style of cartridge. It has a built-in gasket for both the hot and cold and a larger one for the actual spout. Look carefully to see if you notice any damage to the gasket or any built-up debris.
Replacing the Cartridge
Place the cartridge into the seat. Most cartridges have indents that will only allow you to place it into the seat one way.
Secure the retaining cap onto the cartridge by turning it clockwise and then tightening it with the appropriate socket or adjustable wrench.
Re-install the decorative cap.
Now place the handle back on. The kit we are using for an example came with a set screw, and that will get installed into the handle.
Check to make sure the handle is secure.
Turn the water back on and check for leaks.
Two-Handle Faucet
For this example, we have a two-handle faucet with the quarter-turn type valves, with a single spout in the middle. This leak is located around the base of the faucet.
Steps for repairing a leak around the base:
Turn off the water supply.
Remove the retaining nut around the spout. Use a belt off an appliance to place around the spout, this will help get a good grip on the retainer.
Once it is loosened, you should be able to turn it off by hand. Pull the spout up and out of the opening. Some water will may come out of the spout.
Inspect the O-ring for damage.
Replacing the O-Ring
Slide the new O-ring into place.
Clean the base of the faucet where the O-ring will be seated in place.
Thread the retaining nut back onto the faucet by hand and then use the rubber belt and pliers to tighten it.
Steps for repairing a leak around the handle:
Remove the handle to gain access to the cartridge. Loosen the set screw and remove the handle.
Remove the retaining nut.
Pull out the cartridge.
Inspect the O-ring.
Line up the cartridge so it easily sits into place, making sure the indents are lined up properly, and the stop cam is facing towards the center of the faucet.
Re-install the retaining nut by threading it by hand, ensuring it is not cross threaded. Use your wrench to tighten.
When re-installing the handle, make sure the flat side of the stem is pointed away from the center of the faucet.
Line up the set screw with the flat side, tighten and secure.
Make sure there is no slack in the handle.
Turn the water supply back on.
Turn on the faucet to check for leaks.
As you can see, repairing a leaking faucet yourself is a pretty easy fix, and can save you the cost of a repair person. Not to mention saving the cost of all that water and money dripping down your drains! We hope this information will help you with your own DIY repair, good luck!
The PartSelect Content Team has a passion for DIY and we pride ourselves on being a resource for quality, expert content to help you accomplish any DIY project. Alongside our expert repair technicians, our team of experienced technical writers works to provide safe and reliable information on all tasks and jobs around your home. We spend time learning about the problems and projects that our customers are working on, and we make it our job to answer key questions and provide resources for every step along the way. Repairs and DIY projects are what we do, and the PartSelect Content Team wants to help you do them, too.
With the Fix app, you can quickly and easily find information on your appliance, along with videos and articles to help you fix it.
"Like magic. I took a picture of the model number on my refrigerator, and the app identified it right away … Very convenient. I'm impressed." - Clever Jeff ★★★★★
You added 1 item to your cart
✖
$
Qty:
Total item(s) in cart:
Order Subtotal
$
*Taxes and shipping will be applied during checkout