


How to Fix a 5d/Sd/Sud Code on Whirlpool Washers
You’ve loaded your Whirlpool washer and pressed ‘start’. Just when you think you could tick 'laundry' off your to-do list, your machine flashes codes like ‘5d’, ‘Sd’, or ‘Sud’ on the display screen. What’s going on?
These codes mean your washer is dealing with a suds problem, often caused by using the wrong detergent, overloading, or a blocked drain. We're here to guide you through fixing these issues step by step, so you can get your laundry day back on track!
What Does the 5d/Sd/Sud Code Mean on a Whirlpool Washer?
Can't make heads or tails of the '5d,' 'Sd,' or 'Sud' messages on your washer's display? These codes are saying that there's too many suds inside the machine, making it hard for it to drain water properly.
When your washer displays these codes, it pauses the cycle, adds more water, and makes the rinse time longer to dissolve those extra bubbles. You might see this process repeat a couple of times until all excess bubbles are gone.
While your washer tries to fix the problem automatically, letting it happen too often can lead to increased energy consumption, and even wear and tear on the machine. It's like putting a temporary Band-Aid on the problem without addressing its root cause.
Oh, and one more thing: 'Sd' and '5d' might look alike because of the screen's font, but they mean the same thing.
Common Causes of the 5d/Sd/Sud Code
Here are the usual causes of those bubbly error codes:
- Too Much Detergent: High-efficiency (HE) washers are designed to work with less soap. Using more than the recommended amount can lead to overflowing suds.
- Wrong Type of Detergent: High-efficiency detergent is formulated to produce fewer suds. Using non-HE detergent in an HE machine is like putting diesel in a gasoline engine; it's simply not compatible.
- Drainage Problems: Blocked or kinked drain hoses can cause suds to accumulate as the water doesn’t drain properly. This backs up the system.
- Faulty Pressure Switch: The pressure switch checks water levels. If it acts up, it may wrongly think there are extra suds.
Troubleshooting and Fixing the 5d/Sd/Sud Code
No DIY background? No problem! We're breaking down '5d,' 'Sd,' and 'Sud' code fixes for anyone to follow:
Things to Check
First things first, let's run through the basics and see what you should be checking when those codes pop up:
- Is the Washer Overloaded? Make sure you're not asking your washer to carry more than it can handle. When the laundry isn't spread evenly, it can upset the washer's balance and drainage, which might lead to extra suds.
- Is Your Water Causing Suds? Sometimes, if your water has lots of minerals (like hard water), it can create too many suds. You can fix this by using water softeners or filters.
- Are You Using the Right Detergent? Check that you're using the right amount of HE detergent recommended for your machine.
- Did You Use Special Liquid Bleach? Be careful with some types of liquid chlorine bleach labeled as "no splash" or "easy pour." They can cause too many suds. If that's the case, go for regular liquid bleach instead.
Safety Precautions
Before making any repairs, your safety comes first. Please make sure to unplug your washer and turn off its water supply.
How to Troubleshoot the Drain Hose to Fix a 5d/Sd/Sud Code
The drain hose carries away the water used during a wash cycle. You'll spot it attached to the back of your washer. One end connects to your washing machine, while the other end sends water into a drainpipe or laundry drum.
If the hose gets clogged, water can't leave the drum efficiently and suds will start to build up. That's when the error codes show up.
How to Inspect the Drain Hose on a Whirlpool Washer
To check your washer's drain hose, gently move the machine away from the wall to access the back. There, you'll find the drain hose, which is usually a thick, flexible tube. Some washers use hose clamps to secure it, while others have spring clamps. If there's a hose clamp, use a screwdriver or pliers to loosen it, and if it's a spring clamp, squeeze and slide it down to release the hose.
Carefully remove the drain hose, keeping in mind there might be some residual water. Run your hand along the hose, feeling for kinks or sharp bends, and straighten them out for proper water flow.
How to Clean the Drain Hose on a Whirlpool Washer
Insert a plumbing snake into the drain hose, gently pushing it forward to move through bends or obstacles. When you feel resistance, rotate the snake to break up and dislodge the blockage. Keep repeating these steps until the hose is completely clear.
How to Install the Drain Hose on a Whirlpool Washer
When you're putting the drain hose back, make sure to set up the top of the drainpipe (or standpipe if you have a laundry tub or floor drain) just right—somewhere between 39 and 96 inches above the floor. And keep in mind, the drain hose should only go about 4.5 inches into the drainpipe or standpipe. Avoid using tape to hold the hose because it might mess up the water flow.
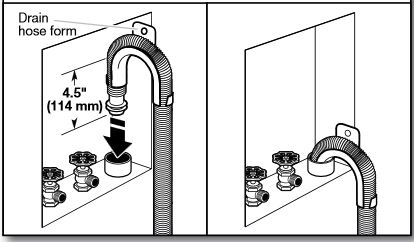
Source: Whirlpool Product Help Library
Explore our genuine OEM drain hoses.
How to Troubleshoot the Drain Pump and Filter to Fix a 5d/Sd/Sud Code
The drain pump and filter make sure that water gets out of your washer without leaving any debris behind. The drain pump does the hard work, pushing water out, while the filter catches stuff like lint and coins so they don't clog up the pump or sneak into your plumbing. You'll usually find them down at the bottom of your machine, but you can refer to your user manual for the exact placement.
Just like the hose, if the drain pump gets blocked, suds can't leave your washer as fast as they should. That's why you should give it a check if you're dealing with a '5d', 'Sd', or 'Sud' code.
How to Inspect the Drain Pump and Filter on a Whirlpool Washer
If you can, place a couple of wooden blocks under the front legs to lift and tilt the washer; this will make it easier for you to remove the bottom panel. Once the panel is off, you'll see the pump.
To take a closer look at the drain pump, place a container beneath it to catch any water left inside, then turn the filter cap counterclockwise to release it (you might need a wrench for this). Carefully disconnect the pump and unplug the wire harness to separate it from the machine.
How to Clean the Drain Pump and Filter on a Whirlpool Washer
If you spot lint, hair, loose change, or small clothing items inside, just take them out them by hand. Then, rinse away any remaining debris under running water.
How to Install the Drain Pump and Filter on a Whirlpool Washer
Screw the filter cap back on tightly. Reconnect the electrical wires to the pump, and gently slide the pump back where it was. Finally, reinstall the access panel.
Explore our genuine OEM drain pumps and pump filters.
How to Troubleshoot the Pressure Switch to Fix a 5d/Sd/Sud Code
The pressure switch keeps track of and controls how much water is in the drum. You'll usually find it in the control panel at the top of the washer.
Here's how it works: Inside your washer, there's a closed tube connected to the drum. This tube is like the washer's ears for water. When you start a washing cycle, the pressure switch listens for changes in air pressure inside this tube. As your washer fills with water or drains it out, the air pressure inside the tube changes, and the pressure switch reacts to make sure your washer uses the right amount of water for each load.
If the pressure switch is broken, the washer might overfill with water. Too much water means too many suds, and that's what triggers the error code.
How to Inspect the Pressure Switch on a Whirlpool Washer
Let's inspect that pressure switch on your washer. Start by removing the top panel to find it. Once you've got your eyes on it, check for visible issues like cracks, rust, or corrosion on the switch's housing or terminals. Also, give those wires connected to the switch a good look to make sure they're firmly attached and free from damage.
If you suspect something's not right, you can remove the pressure switch with a flat screwdriver by releasing any clips or fasteners that hold it in place. Remember to detach it along with the clear tube. While you're checking the tube, examine both ends for any debris, sediment, or water. If you spot any blockages, go ahead and clean them out.
How to Test the Pressure Switch on a Whirlpool Washer
You can test the pressure switch using a multimeter. Blow gently into the tube connected to the switch. If you hear a 'click' sound, it means the switch can sense changes in air pressure.
Set your multimeter to the lowest resistance setting. While blowing gently into the tube, test the terminals in pairs (Terminal 1 and 2, Terminal 2 and 3, Terminal 1 and 3). As you do this, pinch the tube closed to keep the air pressure steady, and write down what happens.
If the multimeter doesn't show any changes when you blow into the tube, it likely means the switch is not working properly.

How to Install the Pressure Switch on a Whirlpool Washer
When the old pressure switch is acting up, it's time to swap it out. To replace it, connect the wires and tube to the new pressure switch, ensuring they're firmly attached. Once the switch is in position, put the washer's top cover back on.
Explore our genuine OEM pressure switches.
Preventing Future 5d/Sd/Sud Codes
To keep those '5d', 'Sd', and 'Sud' codes away, let's do your laundry the right way. Follow these steps to prevent too many suds from causing trouble:
Doing Laundry Properly
Laundry should be a breeze, not a bubble-filled hassle. By doing each step correctly, you can keep your washer humming smoothly for years to come.
Sorting Your Laundry
Start by separating your laundry. Keep dark colors like navy blues, blacks, and grays away from white items to avoid dye transfer. Pay special attention to red items, as they tend to release dye easily, so wash them separately, at least at first. Larger items like blankets can be washed together or separately, depending on the load. Always check garment labels for specific washing instructions.
Preparing for the Wash
Before you start the wash, make sure to check all pockets and remove any items like keys or tissues that could harm your washer. If you have a front-load washer, load your clothes without twisting or wrapping them around the agitator.
Loading the Drum
Place your items inside without cramming too much in. When you put your hand into the drum, there should be enough space for it to move freely.
Using HE Detergent
Whirlpool washers are made to use high-efficiency detergent. These detergents are formulated to create fewer suds. Always measure the detergent and follow the manufacturer's instructions based on the size of your load and how dirty your clothes are.
Selecting the Cycle
Choose the right cycle for your load. Consider the water temperature and cycle length based on the instructions on your garment labels.
Cleaning Your Whirlpool Washer
It's essential to clean away detergent and fabric softener buildup that can collect over time.
Many Whirlpool models have a nifty "Clean Washer" cycle. Just grab the special tablets made for this job, or you can opt for liquid chlorine bleach if you prefer (but always check your use and care guide first).
After you've made your choice, close the washer door, select the cleaning cycle or a regular one with hot water, and let the machine do its thing.
When it's done, leave the door open to air-dry the tub, and don't forget to give the detergent compartment and its surroundings a quick wipe-down now and then.
Maintaining the Drainage System
To keep your washer's drainage system happy, a little monthly TLC does the trick.
- Start by checking the drainage hose to make sure it's clear of any gunk. You can use compressed air to blow through it or a plumbing snake for a deeper clean.
- Also, make sure the drainage hose isn't twisted or bent out of shape.
- Lastly, don't forget to clear out the pump filter regularly.
A round of applause, please! With the '5d,' 'Sd,' or 'Sud' issue now solved, Laundry Day can reclaim its title as the least exciting but most satisfying day of the week.

Avoid laundry disasters by following these laundry tips and tricks. From so...

Get that old lint out, and get your clothes feeling fresher than ever with ...

Properly washing & drying clothes without damaging or fading them is vital....
